Hi, this is my first post for my GitHub blog. I created this post using Hugo. I have used Blogspot for blogging for a while, and I found the blogging experience is less desirable, unresponsive, and slow. I was looking for a static website generator for my github.io pages. In this post, however, I focus only the Hugo first. The hosting on Github.io comes in the next post.
You can create a Hugo website, run it locally in a console, and view it in a browser while in development or writing mode. Hugo is a static website generator, meaning that the Hugo website is just a template, which needs to be built to generate the static files. You then host the generated files. Hugo build is fast, and when a website is run locally using the Hugo server in development mode, you can edit your blog post and view the change directly in your browser. Hugo server generates the static files in memory so there is no actual output.
Once your blog post is ready, you need to regenerate your whole website static files, not just your blog post, and publish them. All of this can be done using Hugo CLI or Command Line Interface. This is a non-traditional way to writing a blog post like using WordPress, or Blogger platforms.
Here are the steps to use Hugo to create a website:
-
Install Hugo on your local machine.
Hugo is just a standalone file, you can just download, extract it, and point your environment path to the location of the file. Alternatively, if you have package management software on your local machine such as chocolatey or scoop you just open bash or cmd console and typechoco install hugoor,
scoop install hugo -
Create a website using Hugo.
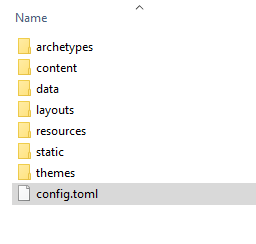
To create a Hugo website, just type:hugo new site [newsite]This will create a new folder with the name you have specified. All website assets are inside the folder. In this post, we will create a website called myblog
hugo new site myblogThe images below show the structure of the new directory.
-
Download a theme.
The previous step has created a Hugo website, but it is still empty. If you run the website locally and browse it, it shows nothing. The next step is to download a theme into the website themes subdirectory. You can download free themes from https://themes.gohugo.io The download button in each theme directs you to the theme repository. If you already have git installed on your machine, clone your choice of theme in the themes subdirectorygit clone [git url] themes/[theme name]Note, you don’t need to follow the default name from the git for the theme name. However, if you want a default name, you can do
cd themes
git clone [git url]
In this post, we use a beautiful Hugo theme, so the command is
git clone https://github.com/halogenica/beautifulhugo.git themes/beautifulhugoAfter you have cloned the theme, don’t forget to delete .git and .github directory inside the beatifulhugo directory. This is important to avoid conflict if the Hugo website is also a git repo.
-
Configure the website.
The next thing is to configure the website to use the theme. In the root website, open the empty config.toml, and add these lines belowtitle = "Kusnadi" theme = "beautifulhugo" [Params] subtitle = "On coding and learning" mainSections = ["post", "posts"] logo = "/img/logo.png" [Author] name = "Kusnadi" email = "<your email address>" github = "kusnaditjung" [[menu.main]] name = "Blogs" url = "" weight = 1 [[menu.main]] name = "Bio" url = "pages/about" weight = 2 [[menu.main]] name = "Tags" url = "tags" weight = 3The top lines are the title for your blog, and the theme used.
The Params section, the first line is subtitle for the blog. The mainSections, is the location inside the content directory to populate blog posts for the home page.
It is arbitrary and can have multiple locations. For this blog, we populate all posts inside post and posts directory. Next is the logo picture, the location is relative to static subdirectory.Author section is information about the author and their social links. There are many other social links supported, you can see config.toml inside the exampleSite subdirectory in the beatifulhugo theme directory.
The remaining entries are for the blog menu. We only create a simple menu containing homepage called Blogs, Bio page, and compilation of Tags page. The home page url is "", the tags url is predefined tags, and the Bio url depend on the location in the content directory.
-
Populate the content and static assets*
The next thing is to populate the content and static assets. From the configuration in step 3, there are two new files needed inside the blog directory.- The logo picture goes to /static/img/logo.png
- The bio page goes to /content/pages/about.md
- In addition, we create our first blog post and this goes to /content/post/first-post.md
Hugo supports a few file formats for blogging. Go to https://gohugo.io/content-management/formats/ to see other supported formats. On the blog post, we add meta-data on the top of the file like below:
---
title: Creating blog site using Hugo
subtitle: Step by step process to create blog site using Hugo
date: 2021-10-17
tags: ["Programming", "Admin", "Hugo"]
bigimg: [{src: "/img/triangle.jpg", desc: "Triangle"}]
---
You can put multiple entries in the tags and bigimg. The blog website generated by Hugo shows the carousel images at the top of the blog post if multiple entries are in the bigimg.
In addition to that, the blog shows the blog posts on the homepage in the order of the date entry, from latest to oldest. You can organise your blog posts inside mainSections paths into a subdirectory of topics and categories, and control the order of display by using date metadata.
-
View blog site in a development mode.
We have completed the website now. You can view it on your local machine in development mode. When running in a development mode, the generated static files for the website are in memory, and you can add a post and edit them. The same applies to the configuration files. Hugo will be regenerated static files if there are changes to the Hugo website. And if you open the blogs in a browser, for any changes to the website (don’t forget to save the changes), the browser will detect the changes and rerender straightaway. To view in a development mode, from the root Hugo website, run:hugo serverThe console display the following:
Start building sites …
hugo v0.88.1-5BC54738 windows/amd64 BuildDate=2021-09-04T09:39:19Z VendorInfo=gohugoio

                   | EN
-------------------+------
  Pages            |  15
  Paginator pages  |   0
  Non-page files   |   0
  Static files     | 187
  Processed images |   0
  Aliases          |   4
  Sitemaps         |   1
  Cleaned          |   0

Built in 463 ms
Watching for changes in D:\Psn\myblog\{archetypes,content,data,layouts,static,themes}
Watching for config changes in D:\Psn\myblog\config.toml
Environment: "development"
Serving pages from memory
Running in Fast Render Mode. For full rebuilds on change: hugo server --disableFastRender
Web Server is available at //localhost:1313/ (bind address 127.0.0.1)
Press Ctrl+C to stop
and browse to the website URL http://localhost:1313. You get something like below on the home page.
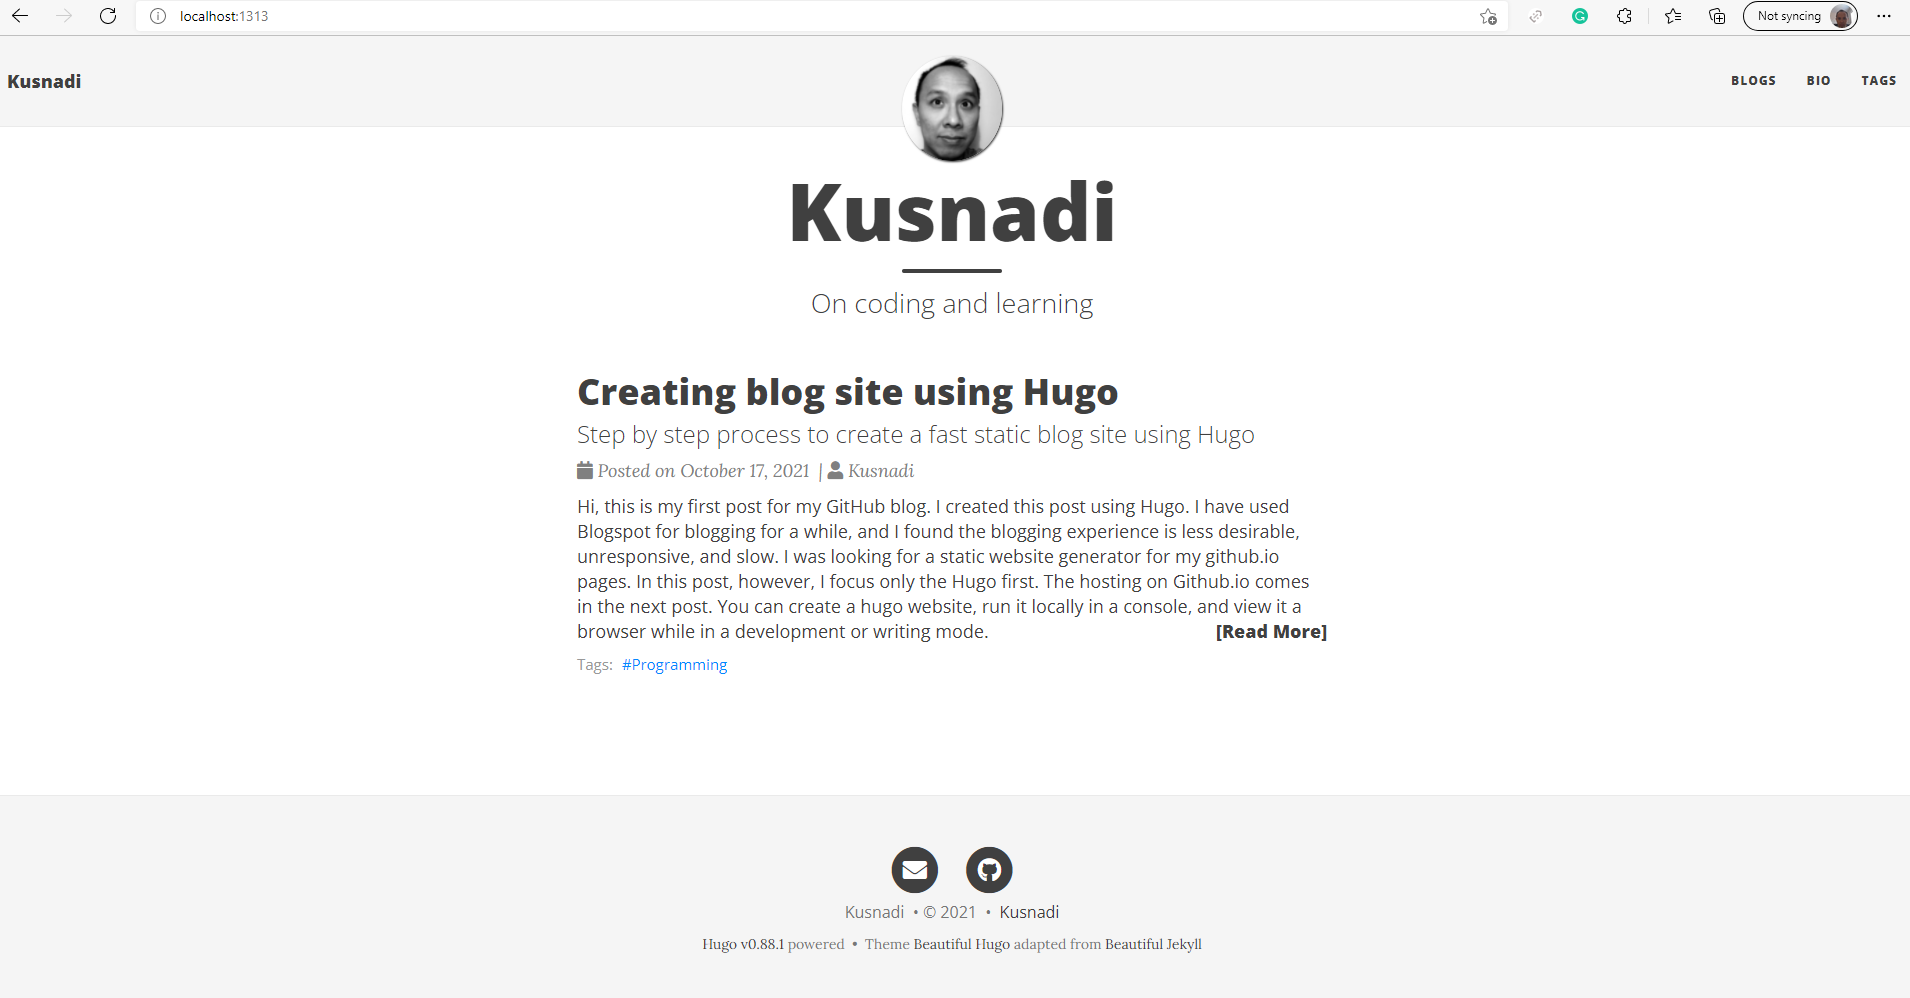
Note, the website URL can be different each time.
-
Publish web site Hugo’s website is for development. For production, you need to use Hugo to generate static files and host them somewhere else. Kill the daemon by pressing CTRL+C, if the development server is still active. To generate static files, run
hugoor,
hugo --minifyThis step creates a public directory in the root. You can control the output directory with option -d and specify the output directory. The minification option minifies the size of generated files. The below picture shows the directory structure.
 .
.You can then host the static files in any web hosting provider.
To summarise, this post shows how to create a static website using Hugo in your local machine using a minimum configuration. They’re still many options available for creating Hugo websites. You can explore the full documentation at https://gohugo.io/documentation/.
In addition to that, each theme may have different parameters defined, and the configuration can be different. The best way to familiarise yourself with each theme is to look for the exampleSite subdirectory inside the theme directory. You can just copy this directory content into the Hugo website root and run hugo server command.
I conclude my post here. In the next post, we touch on the topic of hosting Hugo websites as Github pages.