In the previous post, we walk through the process to create a Hugo website and generating static files. The next process is to host the static files on the internet. Hugo documentation, which can be accessed at https://gohugo.io/hosting-and-deployment/, describes different ways to host and deploy the Hugo website.
The conventional approach is to generate the static files from a Hugo website and host these files with your choice of hosting providers. The other approach is to host the Hugo website as a source control repository and create a pipeline to generate static files and publish them with a hosting provider. The pipeline can be triggered on every push to the repository.
In this post, we use Github as both source control repository, pipeline, and hosting providers. Github pipeline or Github Action is introduced in 2018, and it is a latecomer compared to other source control providers such as Bitbucket and Gitlab which have already introduced pipeline in their offering. Github Pages is a static web hosting service offered by Github for free since 2008.
Github offers a Github page per account. In addition to that, every project can have its own Github pages. The requirements are slightly different between the two. For the GitHub account the page is accessed via URL https://[account name].github.io. For the project or repository Github page, it is accessed via URL https://[account name].github.io/[repository name].
For an account Github page, the static files must be hosted and deployed at repository with name [Github account name].github.io For a repository Github page, the static files must be hosted and deployed at the same repository.
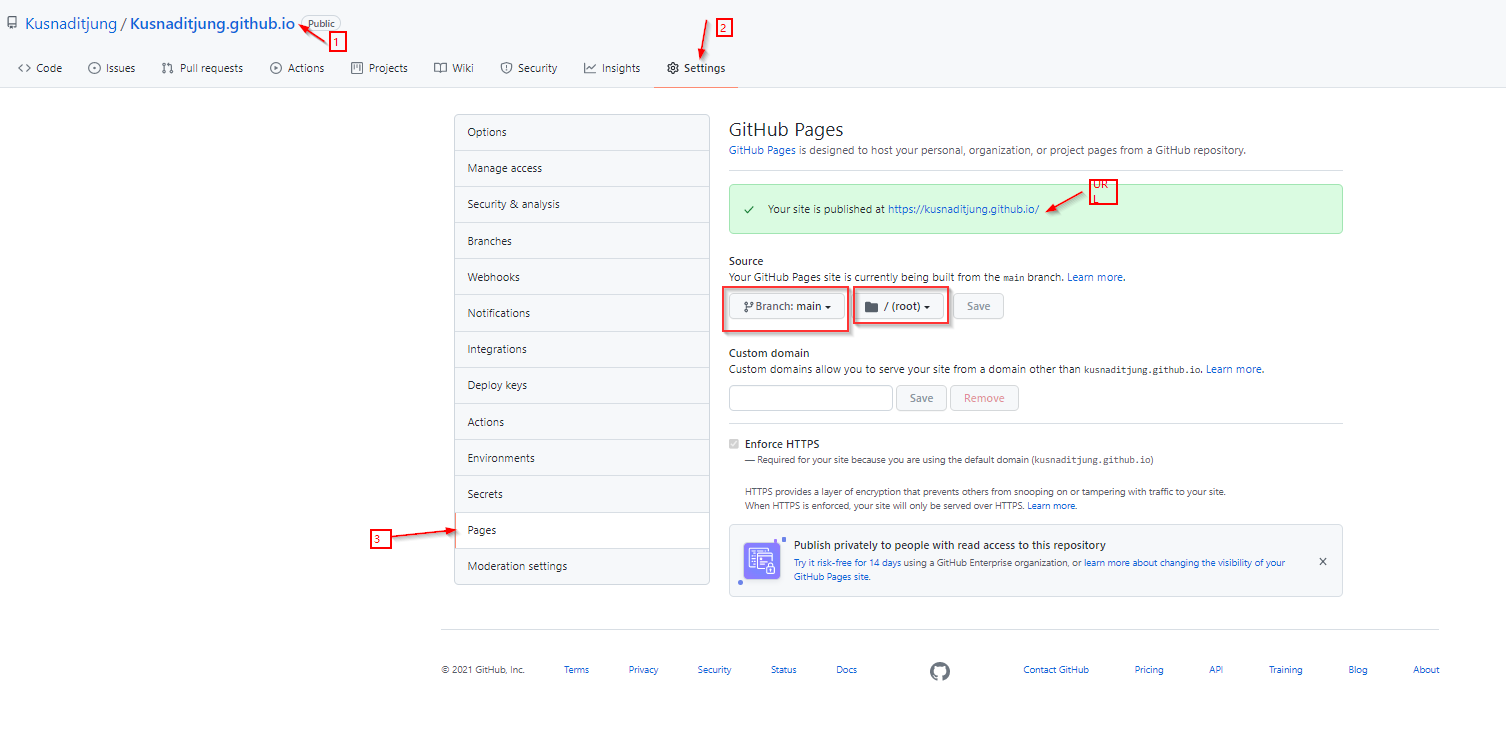
You can configure where the static files should reside from the repository settings. The configuration allows you to select the branch and the directory for the static files. The configuration limit the directory to either root or docs directory (see below)
In this post, we create a Github page for the Github account. So here are the steps:
-
Create a Hugo website locally
To see this step go to the previous post -
Modify the config.toml
Add one line above the title in the config.tomlbaseurl = "https://[account name].github.io" title = "[Your name]" theme = "beautifulhugo" ... -
Add Github action to the Hugo website
create a new file and put them in the .github/workflow/gh-pages.ymlname: github pages on: push: branches: - main jobs: deploy: runs-on: ubuntu-20.04 steps: - uses: actions/checkout@v2.3.5 - uses: peaceiris/actions-hugo@v2.5.0 - run: hugo --minify - uses: peaceiris/actions-gh-pages@v3.8.0 if: ${{ github.ref == 'refs/heads/main' }} with: personal_token: ${{ secrets.PERSONAL_TOKEN }} external_repository: [accout name]/[account name].github.io publish_dir: ./public publish_branch: main destination_dir: ./ force_orphan: trueThe file name is arbitrary. You just need to change your Github account name in the script above. For the secrets.PERSONAL_TOKEN, that is a variable name you need to setup in the next step 4.
There are four steps in the deployments:- The uses actions/checkout@v2.3.5 is to checkout the current repo into the local docker.
- The uses peaceiris/actions-hugo@v2.5.0 is to install Hugo on the docker.
- The run hugo –minify is to run hugo on the docker, the static files are generated on public folder. If you want the output in a different directory, you can control using -d [output directory] option.
- Lastly uses peaceiris/actions-gh-pages@v3.8.0 is to publish the static files to the remote repository.
The if clause indicates that workflow is only triggered when the push trigger happen on the main branch.
There are 6 parameters for this action:
- personal_token which will be come from the repo secrets configuration in the repository settings.
- external_repository, the name of the repository to host the static files
- publish_dir, the directory of the static files to be published
- public_branch, this is a bit misleading, however this is actually for the destination branch to publish the static files
- destination_dir, this is the directory in the destination to publish the static files
- force_orphan, this is to make sure only the current commit exist in the destination branch, this option will overwrite whatever commits in the destination branch.
-
Create Personal Access Token.
In order to publish the static files to the external repository as indicated in the script in the previous step, we need an access token to commit to the [account name].github.io It is a two-step process.
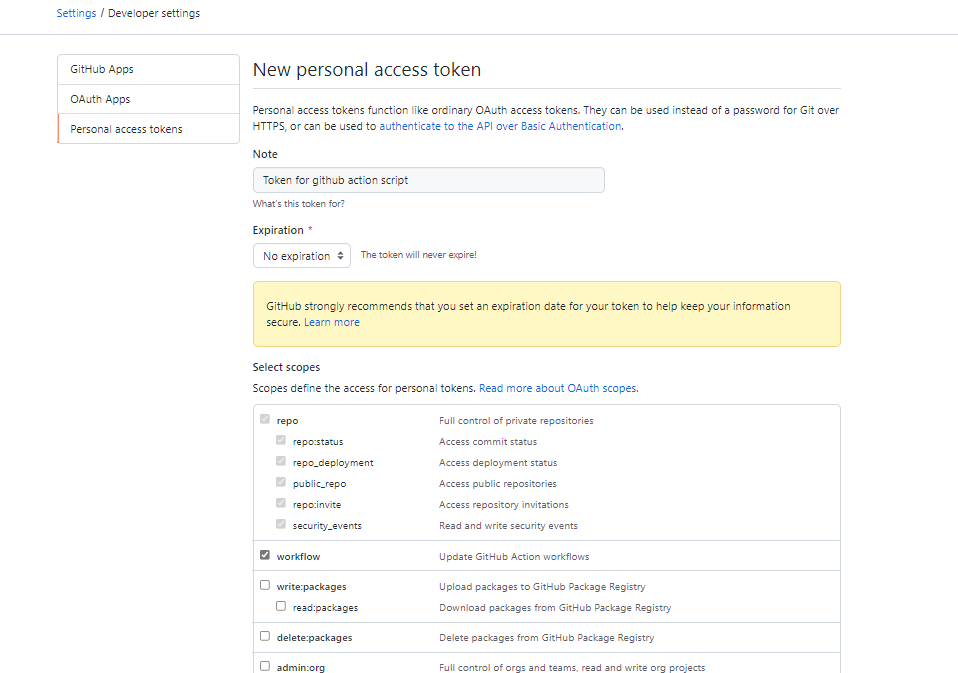
First, we need to create a personal access token.- go to Github account settings (click profile account on the top right and select Settings)
- select Developer settings tab
- select Personal access token tab
- click generate new token button
- Input name, set No expiration, and select workflow scopes
- click generate token button
- copy the key generated (or paste into a notepad, we will use this later in step 7)
Second, we need to set a variable in the Hugo website repository, this will be done in step 7.
-
Create [accout name].github.io repository.
Next, we need to create [account name]github.io repository to host the static files. Go to your Github website, and create a new repository with the above name. You can add a license just to make sure it creates the main branch and add the first commit. Note the script in step 3 will overwrite whatever commit in the branch. -
Configure the Github page for [Account name].github.io.
By default, the Github page URL for the newly created repo in step 5 will be [account name].github.io. If you create any other repo the Github page URl is [account name].github.io/[repository name]. The script in step 3 will deploy the static files at the root directory on the main branch. So nothing to configure for this step. If you change the publish_branch and destination_dir in step 3, you will need to change the destination repo Github page setting configuration. To access this- go to the destination repository in the Github website
- select settings
- select Pages tab
- select the branch and directory (root or docs) for the Github page
-
Create a repo for the Hugo website
The last step is to push the changes in the local repo to the remote repo. Since we assume there is no remote repo yet for the Hugo website, here is the step-
Initiate local repository.
First, we need to initiate the Hugo website as a local git repository and assign it as the main branch (or default branch)git init -b main -
create a remote repository.
The second step is to create a remote repository in Github. You can do this on the Github website, or run a command from your local machine. To do it from your local machine, you need to install gh* command, which you can download and install from https://cli.github.com/manual/installation after that, you need to login to Github withgh auth loginafter you successfully login into Github, you can run this command
gh repo create [project or repo name] -
set secret in the remote repo
After you have created the remote repo for the Hugo website, go to the Github website, and browse the remote repo, and input the secret with key PERSONAL_TOKEN and the value generated in step 4.- go to Hugo website repository settings
- select Secret tab
- click new repository secret button
- input Name with PERSONAL_TOKEN
- input Value with the generated key in step 4.
- click Add secret button
-
create pull changes from remote repo to local repo.
If you have created the remote repo in the previous step, you are prompted to either create LICENSE or .gitignore files in the repo. To pull this change to your local repo, rungit pull --set-upstream origin main -
push your local commit to the remote repo.
Lastly, commit all your local changes and push them to the remote repository.git add . git commit -m "initial commit" git push (or git push -u origin main)
-
Step to create a new blog post:
- Add an md file under content/post of the local Hugo website.
You can run hugo server command and browse your blog locally while you are creating or modifying your md file. - Push your change to remote.
git add .
git commit -m "[your blog post commit message]"
git push